


How to Transfer USDT Safely? The Complete USDT Transfer 2026 Guide

Updated: Sep 24, 2026


A USDT transfer can settle quickly, but the exact time depends on the network, fee settings and the receiving service. The transfer itself is only a few fields and a confirmation; most avoidable losses come from choosing the wrong network or address. Here is the procedure, the cost of each step, and what to check before you send.
Updated: September 24, 2026
Reviewed by: Rick Cramer, Head of Analytics at SimpleSwap
Short answer
To send USDT, open your wallet, choose USDT on a network the recipient supports, paste the recipient’s address, enter the amount, review the fee, and confirm. Most self-custody wallets require the network’s native asset or resources to cover transaction fees: TRX or Energy/Bandwidth on TRON, ETH on Ethereum, SOL on Solana, and GRAM on TON.
Wallet-to-wallet transfers may appear within seconds on fast chains, while Ethereum inclusion and exchange crediting can take longer. The key rule is that the network must be supported by the recipient. A wrong-network transfer may be recoverable in some self-custody EVM cases, but recovery from custodial services is often difficult, discretionary, or impossible.
Introduction
A safe USDT transfer in 2026 comes down to a few repeatable habits: pick the right network, verify the address the right way, and confirm details before signing. Crypto transfers can be irreversible once confirmed, so small checks done prior to a transaction often matter more than speed.
This USDT transfer guide 2026 stays practical. It covers what USDT is, how transfers work at a high level, how to choose a wallet, and how to transfer USDT to another wallet without stepping into the most common traps.
By the end, readers should feel ready to send USDT safely and confidently, choose the right network for the recipient, and troubleshoot the usual “How to transfer USDT?” moments using a checklist approach. The structure is simple: mechanics → wallet choice → step-by-step sending → recovery playbook → FAQ.
What Is USDT and How Does It Work?
USDT looks simple on the surface, yet the “version” of USDT matters more than many beginners expect. Before touching buttons to make a transaction or move coins, it helps to know what USDT actually is on-chain.
Understanding USDT Crypto
USDT (Tether) is a stablecoin designed to track the U.S. dollar at a 1:1 rate in concept, so 1 USD₮ is meant to correspond to 1 USD. It’s often used as a “digital dollar” inside crypto, for trading, transfers, and keeping value steadier than many volatile coins.
A key detail for beginners: a USDT transfer is not a bank transfer. It’s a token move recorded on a blockchain, and the token can exist on more than one blockchain simultaneously. That means “USDT” is a name shared by multiple network-specific forms of the same asset, like USDT on Ethereum (ERC-20) or USDT on Tron (TRC-20).
Common USDT Networks: ERC20, TRC20, and More
USDT exists across multiple blockchains, and each chain has its own address format, fee market, and confirmation behavior. The practical takeaway is simple: the network used to send must match the network the recipient expects, or funds can get stuck or routed somewhere unintended.
Here are common USDT networks and typical reasons people pick them (fees and speed vary by market conditions):
- Ethereum (USDT ERC20): Widely supported across exchanges and DeFi apps, often chosen for compatibility.
- Tron (USDT TRC20): Popular for day-to-day transfers where both sides support Tron addresses.
- Solana / Polygon / others: Often used when the recipient wallet or platform supports those networks and the user already operates there.
A quick mental model helps: “USDT” is the asset name, and the network label (ERC20 for Ethereum, TRC20 for Tron, and so on) tells the chain and the address type.
How a Tether Transfer Technically Works
Knowing how to send USDT to someone is what keeps a transfer calm, even if the transaction takes longer than expected.
Signing → Broadcast → Confirmations
A USDT transaction starts in a wallet interface, yet the wallet is really preparing a request for the blockchain. Once approved, the wallet signs the transaction using the private key, then broadcasts it to the network for processing.
After broadcast, the network includes the transaction in blocks, and each new block adds confirmations. More confirmations usually mean stronger finality, and once a transfer is confirmed, it is typically not reversible in any practical way.
Every on-chain transfer gets a TXID (transaction ID), which is a unique identifier that works like a receipt number. That transaction ID lets anyone track status and confirmations in a block explorer, plus it’s the first thing support teams request when a transfer is missing.
What the sender controls vs what the network controls:
- Sender controls: Recipient address, network choice, amount, and the final “confirm” action.
- Network controls: Congestion, fee market behavior, confirmation pace, and final ordering in blocks.
Network Choice, Fees, and Speed
Network choice is a safety decision first, then a cost and speed decision. Tether can exist on multiple chains, so on the recipient’s end of the transaction there’s a need to support the exact chain used for the send.
Fees are dynamic and can change fast based on demand for block space, plus some wallets let users pick fee levels. A transfer that looks cheap at 3 AM UTC might be pricier an hour later. Speed shifts too, since congestion and confirmation requirements differ by network and by recipient platform.
A simple decision flow that works for most people:
- Check which USDT networks the recipient supports (this is rule #1).
- Check which of those networks the sender wallet supports.
- Compare estimated fees and expected confirmation period inside the wallet.
- Send a small test transfer first, then send the rest after it arrives.
Getting USDT First with SimpleSwap (Before Transferring) for Fiat or Crypto
Having gotten the initial gist of how to send USDT, many users start this journey by swapping from another crypto into USDT or buying it for fiat, then transferring USDT to a wallet or exchange address.
SimpleSwap helps users obtain USDT as a starting point for that workflow, which can make later transfers simpler since there are fewer intermediate steps.
Exchanging/buying via SimpleSwap keeps “hops” to a minimum where possible, since each extra transfer is another possible moment for a wrong address, incorrect network, or rushed click.
The process of buying USDT for fiat on SimpleSwap is fairly straightforward:
- Select the Currency Pair in the Buy/Sell Crypto tab on the SimpleSwap homepage. In the You Send section, pick your desired fiat currency (e.g., USD). In You Get enter USDT.

2. Click the Exchange button and choose one of the several payment methods and providers. Enter the recipient’s wallet address. Double-check the address for accuracy, ensuring it matches the correct network for the selected coin.
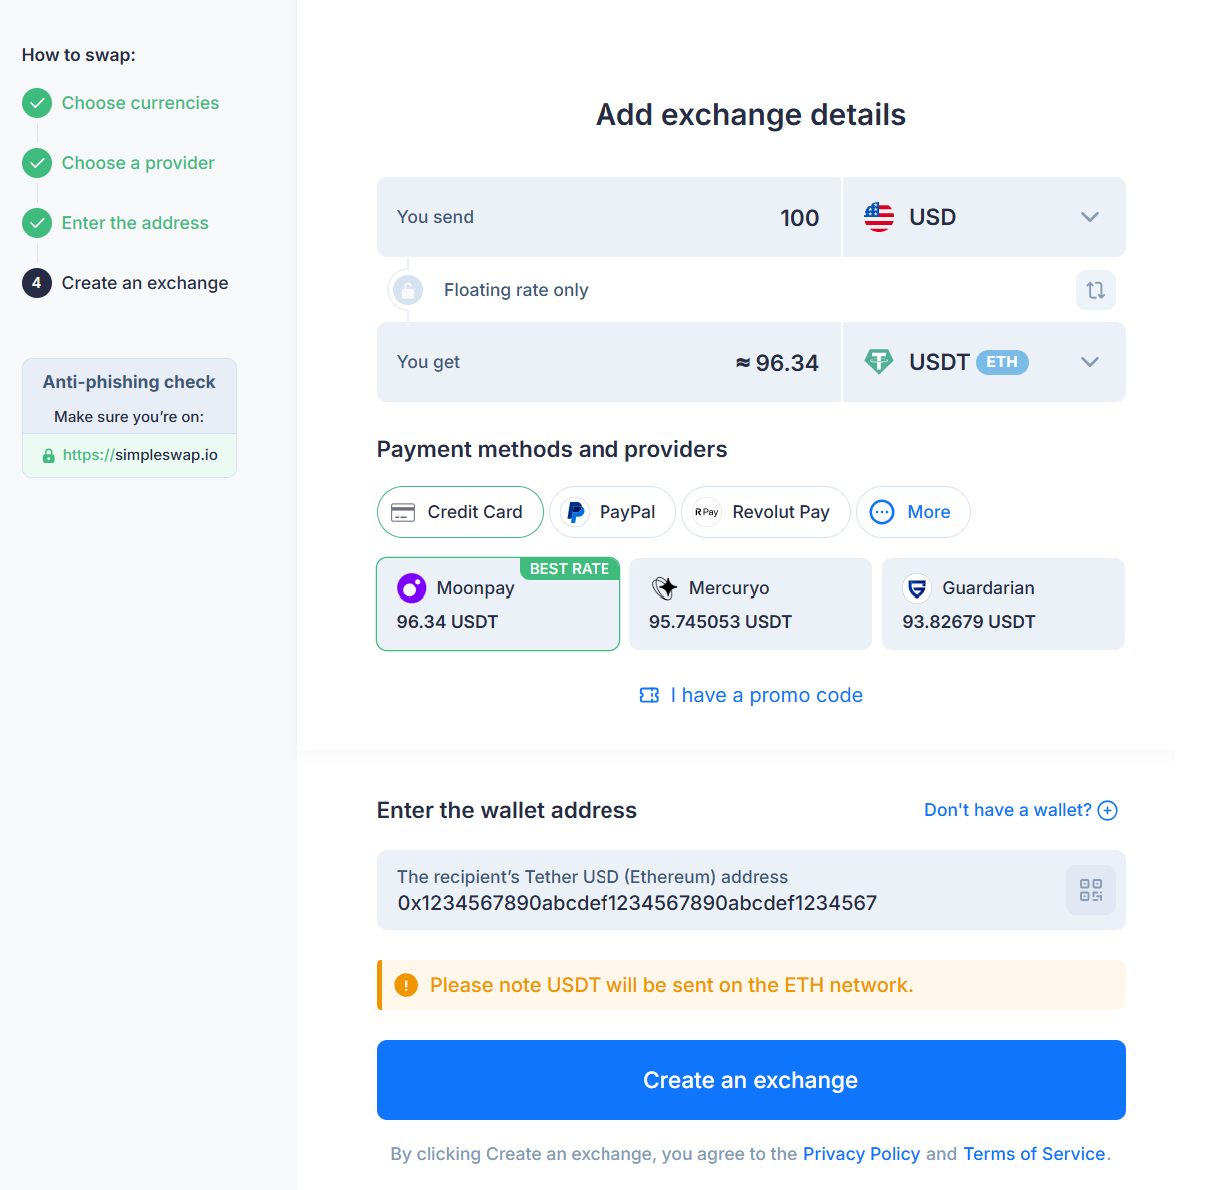
*The wallet address on the picture is provided for example purposes only, it is not a real one.
3. Click Create an Exchange. You will be redirected to the provider’s page to complete the purchase. Follow the instructions.
4. Once your payment is confirmed and the exchange process is finished, USDT will be sent to the recipient’s wallet address you provided.
USDT is multi-chain, so the user needs to choose the right USDT network during setup to receive Tether in a form compatible with the destination wallet.
What does a USDT transfer cost
| Network | Fee paid in | Typical cost to send USDT | Notes |
| TRON (TRC20) | TRX, or Energy/Bandwidth resources | Variable. If the wallet has enough Energy/Bandwidth, little or no TRX may be burned; otherwise, the transfer burns TRX according to current resource pricing | USDT transfers can consume materially more Energy when the recipient does not already hold the token. Exchange withdrawal fees are separate and exchange-set |
| Ethereum (ERC20) | ETH | Variable gas fee; it can be low in quiet periods and materially higher when demand rises | Check the wallet’s live estimate at send time |
| Solana | SOL | Base fee is 5,000 lamports per signature, plus any priority fee; a first token receipt may also require creation of an associated token account with a rent-exempt balance | The exact account-creation amount should be queried at send time rather than treated as a fixed fee |
| TON | GRAM (native currency of TON; formerly Toncoin) | Typically very low, but use the wallet’s live estimate | A comment/memo is only needed when the receiving service specifically requires one |
Fees move with network conditions and governance decisions. The number on your wallet’s confirmation screen is the one that applies.
How long does a USDT transfer take?
| Network | Time to first confirmation | Time until most exchanges credit |
| TRON | New blocks are produced about every 3 seconds; wallet-to-wallet transfers are often visible within seconds | Exchanges choose their own confirmation threshold, so crediting may take from seconds to several minutes or longer |
| Solana | Usually sub-second to a few seconds for inclusion/visibility under normal conditions | Often seconds to minutes, depending on the receiving service’s policy |
| TON | Around one second to finality under the current Catchain 2.0 design | Often quick, but the receiving service can add its own processing time |
| Ethereum | A properly priced transaction is commonly included within one or a few 12-second slots | Exchanges set their own confirmation policy; protocol finality is currently around 15 minutes |
Wallets can show a transfer as soon as it is included or observed by the network, but custodial services apply their own confirmation and risk policies before crediting a deposit. That is why an explorer can show a successful transfer while an exchange still shows the deposit as pending.
Choosing the Right Wallet
Once USDT is in hand, wallet choice shapes daily safety more than most people expect. The goal here is to reduce easy losses.
Hardware Wallets (Cold Wallets)
A hardware wallet (often called a cold wallet) keeps private keys in a device designed for signing transactions without exposing the keys to an internet-connected environment. This reduces the attack surface compared with many everyday devices used for browsing, messaging, and downloads.
For long-term holdings and larger balances, hardware wallets are often preferred since transfers require deliberate steps and approvals. That “slower pace” can be a feature, not a drawback, since it creates a natural pause to verify the network and address.
Operational tips that prevent common mistakes:
- Write the seed phrase on paper or metal, then store it in a place with controlled access.
- Never type the seed phrase into random websites or “recovery” forms.
- Update device firmware only through the official app or official site.
- Verify the recipient address on the hardware wallet’s own screen before confirming.
- Do a small test transfer to a new address before sending a larger amount.
Software Wallets (Hot Wallets)
Software wallets (hot wallets) run on devices connected to the internet, like mobile apps, desktop apps, or browser extensions. This mobile wallet format is convenient for frequent transfers, yet it relies on device hygiene and phishing awareness.
The main risks tend to be practical, not theoretical: fake wallet apps, malicious browser extensions, phishing pages, and malware that interferes with copying and pasting addresses. Clipboard threats matter more now, since many people make a transaction pasting addresses without checking more than a few characters.
Safety defaults that improve day-to-day outcomes:
- Download wallet apps only from official stores or official project pages.
- Keep the operating system and wallet updated, not “someday” updated.
- Turn on screen lock and biometrics, plus a strong device passcode.
- Re-check the first and last 4–6 characters after pasting an address.
- Keep a separate “daily” wallet for small amounts, and store larger balances elsewhere.
Multi‑Wallet Setups
For larger balances, a multi-wallet setup can reduce the damage from one bad day. The common pattern is a hardware wallet for storage plus a smaller hot wallet for everyday transfers.
This separation creates a clean boundary. The daily wallet can interact with apps and links, and the storage wallet stays quiet and boring. Boring is good in crypto. It limits exposure to phishing, fake approvals, and accidental transfers made in a rush.
Risks When Transferring USDT
Moving on to spotting the failure modes that keep repeating across the crypto space. Most losses are small mismatches and rushed confirmations.
Wrong Network Selection (TRC20 vs ERC20, etc.)
Wrong-network transfers remain one of the most painful mistakes with USDT, since USDT exists on multiple chains. A classic scenario is sending USDT TRC20 to an ERC20-only deposit address, or the reverse, after copying the address from the recipient platform without noticing the network label.
Many platforms show warnings and confirmations for network selection, yet mistakes still happen since “USDT” looks familiar and users expect it to behave like a single universal token. The recovery path depends on where it was sent and whether the recipient controls the receiving address on that chain, so outcomes vary and can be slow.
Wrong or Poisoned Wallet Address
Those addresses are long, and humans are not built to compare 42-character strings under stress. A simple typo can send funds to the wrong place, and on-chain transfers are typically irreversible once confirmed.
More subtle threats have grown in recent years. Address poisoning attacks aim to trick users into copying a lookalike address from transaction history, and clipboard hijacking (clipper malware) can replace a copied address with an attacker’s address right before paste. Halborn notes that clipper malware watches the clipboard for blockchain address formats and swaps the destination to redirect funds.
Platform and Wallet Security Risks
Even a perfectly executed transfer can go badly if the wallet app, device, or platform is compromised. The risk is not limited to “big hacks” in the news, either. It can be a fake app, a malicious extension, or a phishing site that looks almost right.
A cautious baseline helps: pick widely reviewed wallets, avoid anonymous tools with no track record, and keep core security settings turned on. For exchange accounts, use strong login hygiene, then treat withdrawal settings like safety gear, not decoration.
Managing Token Approvals, Phishing, and DApp Risks
If USDT is used in DeFi, extra risk enters through token approvals. Many dApps ask for permission to spend tokens, and those approvals can stay active even after the user stops using the app. Trust Wallet describes token approvals as permissions granted when connecting to a dApp, and it notes they can remain active indefinitely until revoked.
Phishing ties into this, since a fake site can trick a user into approving a malicious contract interaction. A practical habit is to review approvals periodically, then revoke permissions tied to apps no longer trusted or used.
Precautions
This is the “set yourself up to win” part. A clean setup reduces the odds that a normal transfer turns into a frantic search for a missing TXID.
Setting Up a Secure Wallet Environment
Start with the device, since the wallet lives on it. Keep the OS updated, remove sketchy extensions, and avoid installing random APKs or unofficial plugins. Clipper malware is often distributed through unofficial app stores and phishing pages, so app source matters.
Backups come next. Seed phrases should be backed up offline, stored privately, and never entered into websites that claim they can “fix” a wallet. A seed phrase is not a password reset link. It is the master key.
For larger balances, separate environments help. One device or browser profile for crypto tasks cuts down accidental clicks and reduces the chance that a random extension gets access to sensitive activity.
Enabling 2FA, Whitelists, and Extra Protections
For exchange accounts and custodial platforms, 2FA is the starting point. App-based 2FA is often preferred over SMS in many security guides, yet the exact choice depends on user risk tolerance and availability in each region.
Address whitelisting is one of the most effective protections for recurring transfers. It means withdrawals are allowed only to pre-approved addresses, so a stolen password alone is not enough to drain funds. Some platforms add a waiting period for new whitelist entries, which helps catch account takeovers before money moves.
Treat these settings like a baseline. The extra minute spent setting them up is far cheaper than trying to unwind a confirmed on-chain transfer.
Pre‑Transfer Checklist: Triple Verification
Triple verification means checking the same three things every single time, even for “small” sends. It reduces rushed errors and catches clipboard swaps.
- Network
Confirm the recipient supports the exact USDT network you plan to use.
- Address
Paste, then compare the first and last 4–6 characters with the recipient’s address source, plus confirm any QR scan matches what is shown.
- Environment
Close extra tabs, avoid public Wi‑Fi for large transfers, and pause if anything feels off or unfamiliar.
Step‑by‑Step: How to Transfer USDT Between Wallets
The actual send flow is usually simple. The key is to slow down for the two places where most people slip: network selection and address verification.
Sending USDT from One Wallet to Another
A platform-agnostic USDT transfer tutorial looks like this:
- Open the sending wallet and pick USDT.
- Tap Send (or Transfer).
- Paste the recipient address or scan a QR code.
- Select the correct network (ERC20, TRC20, or the one the recipient supports).
- Enter the amount.
- Review the summary screen carefully, then confirm.
Pro tips work: pause and re-check the first and last characters of the address after paste, and confirm the network label one more time right before final approval.
Transferring USDT Between Exchanges
Moving USDT between exchanges follows the same logic, with more screens. First, get the deposit address from the receiving exchange and select the deposit network it supports. Then, in the sending exchange, start a withdrawal for USDT and pick the same network.
Before confirming, compare the network name on both sides and re-check the address string. After submission, save the TXID so transfer status can be tracked in a block explorer or shared with support if needed.
Example Scenario: Small Test Transfer Before a Large Move
A simple pattern reduces stress for larger transfers: test first, then move the remainder. Say a user wants to move a larger sum of USDT to a new wallet. They send 5–10 USDT as a test, wait for it to arrive, then send the rest.
This confirms the network match and address correctness in real conditions, plus it verifies the recipient wallet can actually receive and display that USDT network version. If the test does not arrive, the problem is smaller and easier to investigate with the TXID.
What to Do When a USDT Transfer Goes Wrong
Problems happen, and panic makes them worse. A calm recovery playbook starts with one rule: confirmed on-chain transfers are usually not reversible, so fast accurate triage matters.
- Problem: Stuck or pending transaction.
What it means: the network has the transaction, yet it has few confirmations, or the fee level is low for current congestion.Immediate actions: find the TXID, open it in a block explorer, and check status plus confirmations.What not to do: don’t re-send blindly to “fix it,” since that can create two sends.
- Problem: Sent on the wrong network.
What it means: USDT was sent on a chain the recipient does not support for that address.Immediate actions: stop further transfers, collect TXID and timestamps, contact the recipient platform if it controls the address.What not to do: don’t trust random “recovery” services asking for seed phrases.
- Problem: Sent to the wrong address (or poisoned address).
What it means: funds went to a different wallet, often through a copy-paste swap or poisoned history entry.Immediate actions: verify the pasted address against the source you intended, then document the TXID and destination.What not to do: don’t install new “fix” apps in a rush, since clipper malware is often delivered via unofficial downloads.
Round-Up
Safe USDT transfer habits are not flashy, yet they compound. Network match first, address verification second, and a short pause before signing third. Do that for every send, and most common losses stop being “bad luck” and start becoming avoidable errors.
None of this is financial advice. It’s operational risk management for moving tokens that can be hard to recover once confirmed. TXIDs, checklists, test transfers, and careful platform selection are habits worth keeping for any stablecoin, not just USDT.
FAQ: How to send USDT
How do I send USDT to another wallet?
How much does it cost to send USDT?
How long does it take to send USDT?
Can I send USDT without paying gas?
What happens if I send USDT to the wrong network?
Do I need a memo to send USDT?
Can I send USDT from one network to another?
What is Address Check?
The information in this article is not a piece of financial advice or any other advice of any kind. The reader should be aware of the risks involved in trading cryptocurrencies and make their own informed decisions. SimpleSwap is not responsible for any losses incurred due to such risks. For details, please see our Terms of Service.